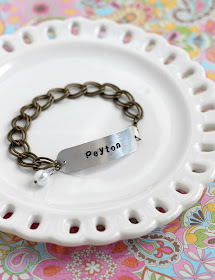
Even if you're a beginner metal stamper like myself, with a little practice you can make a bracelet like this yourself in less than an hour.
To create the stamped portion of the bracelet, you need several supplies. Many of my supplies were sent to me a few months ago by GoodyBeads.
Supplies:
- Stamping Strips
- Brass Metal Stamping Hammer
- Stamp Straight Tape
- Bench Block
- Lower Case Metal Stamp Set
- Upper Case Metal Stamp Set--I bought this set from Hobby Lobby with my 40% off coupon.
- Metal Punch--The one I have is not currently on the GoodyBead website.
- Nylon Jaw Bracelet Bending Plier--I bought these from Amazon, and this is an affiliate link.
- Black Permanent Marker
- Alcohol
- Polishing Pad (not pictured)
First, take the metal blank and punch holes in each end. I will be honest with y'all. I just eyeballed it. I don't have the patience to measure where a little tiny hole should go.
After your holes are punched, stamp your design. Use the straight tape to line up the metal blank on the bench block. Use a ruler to make evenly spaced marks on the tape to help you space out your letters and words properly. You can even write the letters on the tape where you want them to go. Then stamp each letter, making sure to hit the stamps VERY hard with the brass hammer.
Remove the blank from the block, and color in the letters with a permanent marker. Remove the excess marker with a soft cloth and rubbing alcohol. Use the polishing pad to shine the piece and remove any fine scratches.
Use the nylon bracelet bending pliers to bend your blank into a shape that will fit snuggly against a wrist. Do this by putting a small portion of the bracelet in the pliers and pressing down hard. Slide the bracelet down a little and close the pliers again. Keep repeating this process until the whole blank is curved. And that's all there is to the stamping portion of the bracelet. All that's left is making the blank into a bracelet.
Cut a piece of chain the desired size of your bracelet minus the length of the blank. Attach the end of the chain to the blank with a jump ring. Use another jump ring to attach a clasp to the other end of the blank. You can then just open the clasp and insert the end of the chain to close the bracelet.
If you want to make the bracelet a little fancier, make a small charm with a headpin and a few beads. Attach that to one of the jump rings.
Then your (or in my case, my cousin's) DIY metal stamped bracelet is done.
The cool thing about this gift is that it's completely unique, plus it's easy to make and inexpensive. I used this same process to create a few other stamped bracelets for gifts.
I created this one for my cousin-in-law. It features the name of her brand new baby girl. I'm pretty sure that I'll be making these often when I need personalized, inexpensive gifts.
If you haven't tried metal stamping before, I highly suggest you buy a few starter tools and blanks and give it a try. It's pretty addictive, and you can make so many great personalized pieces of jewelry!


Love it!! Have you tried ImpressArt's Soft Strike blanks? They're much easier to get a clear impression {I noticed your comment about hitting very hard} and now I won't use anything else!
ReplyDeleteLove the bracelets. I tried this a couple of years ago at a class and really enjoyed doing it. Needless to say I didn't buy the supplies. I started into bead work instead. You do the best gifts...my birthday is in September..just a little hint!!!! LOL
ReplyDeleteWOW, this bracelet is amazing! You are a metal stamping guru, Bethany! :D
ReplyDeleteLove your bracelet and would love to make necklaces and bracelets for gifts and myself, teenage grand kids.Saw comment above about using ImpressArts' Soft Strike blanks. Have to see who carries them in Junction. You sure did great job for being first time attempting this craft. Have admired this kind of jewelry online but was hesitant due to possible costs of supplies/tools to make them. Will keep this in mind. Glad you shared this great tutorial. Encourages me to get what I need to try it. Hope your holidays were wonderful, I was AWOL for while due to learning how to use new pc (windows 8.1) Yes I am quite digitally challenged. Kept working on it and reading tutorials offered, (thank heavens) plus was exhausted from working on stuff for craft show and finishing up getting ready for Christmas. Then getting house cleaned up and stuff put away, what a mess. Thankfully all over with but not sure I'd want to do craft show so close to holidays again. Getting bit long in tooth for all that. Getting lazy too maybe. Happy New Year
ReplyDeleteI adore your project. Makes me want to pull out my jewelry making supplies and actually make something with it!
ReplyDeleteSo gorgeous! Endless possibilities. :)
ReplyDeleteI cannot believe the jewelry you just whip up?! So beautiful and you always make it look effortless. That kind of crafting just doesn't happen around here!
ReplyDeleteLove it girl!!
ReplyDeleteLove this! It turned out great and this could be addicting! Featuring when my link party opens up tonight!
ReplyDelete