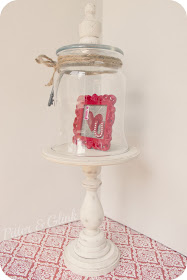
In August, I had the pleasure of guest posting at the CSI Project. The theme of the week was Valentines in August, and I shared this project. Since Valentine's Day is just around the corner, I'm sharing it here today...
When it comes to decorating for holidays, I like to use items that are versatile. I don't have a ton of storage space in my house, so I can't buy a multitude of holiday specific items, even though I'd love to. With this in mind, I created this versatile piece of Valentine's decor.
First, you need a few supplies to make the cloche.
- Wooden candle holder
- Small wooden disc
- Large wooden disc
- Finial
- Glass pillar candle holder
- Wood glue
- Industrial strength adhesive
- Paint & paint brush
Begin by assembling the cloche stand.
Glue the small wooden disc to the bottom of the candle stick. I used a nail to help secure the disc as well.
Next, glue the large disc to the top of the candle stick. I used a nail in this step as well.
If your finial has a screw in the bottom of it as mine did, use pliers to remove the screw. Then paint the newly assembled cloche stand and the finial the color of your choice.
I chose to distress my stand with sand paper and Soy Stain because I wanted it to have a vintage look, but you may not like distressing, and that's just fine. :) Next, spray the stand and the finial with a clear coat to protect it.
Once everything is dry, use an industrial strength adhesive to adhere the finial to the top of the glass candle holder. (I know the finial is not painted in this photo. Please ignore that...) This creates your cloche.
You can embellish your cloche with anything you'd like. I chose jute and a skeleton key.
To create the frame to go inside the cloche, simply decorate a small frame from the craft store with scrapbook paper and stickers.
Put your frame inside your cloche and enjoy your new Valentine's Day decor!
I love the creamy finish of the cloche stand.
The little frame is the only thing about the piece that is Valentine's Day specific.
To use the piece for different holidays, simply remove the frame.
Then you'll simply be left with a beautiful, vintage-looking cloche and stand.
I have to say that it does look great combined with red, though!


cute Bethany! I love the key hanging from the jute on the outside, dresses it up perfectly. a sweet project. I have a couple valentine cloches here. I'll have to post pics of them.. one I need to change up a bit first.
ReplyDeleteI just posted a cute tutorial that you might like, be sure to check it out.
happy Thursday!
xoxo
super cute, juts love it..
ReplyDeleteThis is beautiful! Great job on the distressed wood, and thanks for the soy stain tip!
ReplyDeleteThat's so cute!
ReplyDeleteI love this! I found you at the Do Something Crafty Party and I’ve become your newest follower on GFC. I’m also hosting a party this week and I would love for you to come by and share this at my party - Fluster’s Creative Muster.
ReplyDeletehttp://www.flusterbuster.com/2013/01/flusters-creative-muster-party-4.html
Hugs and Smiles,
Robin
@ Fluster Buster
So cute Bethany!
ReplyDeleteHi, Bethany
ReplyDeleteI love this project. It's lovely and I have to steal this idea. LOL Thanks!
Vanessa
I remember seeing this in August, thinking that I must make one...never did. Now, I'm thinking I REALLY must make one of these! Adorable!
ReplyDeleteLovely. Truly lovely. I love the twine wrapped around the glass with the key. I love that you antiqued the base. It is a very sweet addition to Valentine's day decor.
ReplyDelete